
Spring 에서는 상당히 많은 AutoConfiguration 을 제공해주고 있는데, 따로 라이브러리를 만들면서 직접 만들 수도 있다.

테스트로 하나 만들어보자
구성
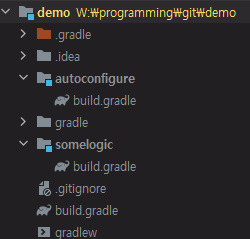
우선 구조는 아래처럼 잡고 멀티모듈로 구성했다.
- autoconfigure - Spring Boot 에서 자동으로 AutoConfiguration 이 적용되는 로직 관련
- somelogic - 비즈니스 로직
// root - build.gradle
buildscript {
    ext {
        projectVersion = '1.0.0'
        projectGroup = 'kr.pe.karsei'
        springBootVersion = '2.7.5'
        springDependencyVersion = '1.0.15.RELEASE'
    }

    repositories {
        maven { url "https://plugins.gradle.org/m2/" }
    }

    dependencies {
        classpath "io.spring.gradle:dependency-management-plugin:${springDependencyVersion}"
        classpath "org.springframework.boot:spring-boot-gradle-plugin:${springBootVersion}"
    }
}

group = projectGroup
version = projectVersion

allprojects {
    apply plugin: 'java-library'
    apply plugin: 'maven-publish'

    repositories {
        mavenCentral()
    }
}

subprojects {
    apply plugin: 'io.spring.dependency-management'
    apply plugin: 'org.springframework.boot'

    dependencies {
        // Lombok
        compileOnly 'org.projectlombok:lombok'
        annotationProcessor 'org.projectlombok:lombok'

        // Test
        testImplementation 'org.assertj:assertj-core'
        testImplementation 'org.mockito:mockito-core'
        testImplementation 'org.junit.jupiter:junit-jupiter-api'
        testRuntimeOnly 'org.junit.jupiter:junit-jupiter-engine'
    }

    test {
        useJUnitPlatform()
    }

    bootJar {
        enabled(false)
    }
    jar {
        enabled(true)
        classifier('')
    }

    task sourceJar(type: Jar) {
        from sourceSets.main.java.srcDirs
        classifier('sources')
    }

    publishing {
        publications {
            mavenJava(MavenPublication) {
                from components.java
                groupId projectGroup
                version projectVersion

                artifact sourceJar
            }
        }
    }
}
root 에 있는 build.gradle 은 나중에 maven 에 배포할 경우까지 고려하여 작성하였다.
Lombok 과 테스트는 이용할 수 있도록 각 모듈에서 사용할 수 있도록 했고, artifact 에 sourceSet 을 추가하여 나중에 다른 프로젝트에서 해당 라이브러리를 참조할 때 바이트 코드가 아닌 소스를 볼 수 있도록 하였다.
// autoconfigure - build.gradle
dependencies {
    implementation 'org.springframework:spring-test'
    implementation 'org.springframework.boot:spring-boot-test'
    implementation 'org.springframework.boot:spring-boot-autoconfigure'
    annotationProcessor 'org.springframework.boot:spring-boot-configuration-processor'

    implementation(project(':somelogic'))
}
// somelogic - build.gradle
// nothing그 외의 build.gradle 은 필요한 의존성만 추가했다.
이제 코드를 작성해보자
간단한 비즈니스 로직을 먼저 작성했다. 단순히 "Hello, World!" 를 출력해주는 로직이다.

public class SomeThing {
    public String sayHello() {
        return "Hello, World!";
    }
}
다음으로 autoconfigure 모듈에서 간단하게 AutoConfiguration 을 만들어보자.
우선 SampleAutoConfiguration 이라는 이름으로 자동 설정이 될 클래스를 만들었다.
아래에 있는 주석 부분은 이후에 설명한다.
import org.springframework.boot.autoconfigure.condition.ConditionalOnMissingBean;
import org.springframework.context.annotation.Bean;
import org.springframework.context.annotation.Configuration;

//@Configuration(proxyBeanMethods = false)
//@AutoConfiguration
@EnableConfigurationProperties(SampleLibProperties.class)
@ConditionalOnProperty(name = "samplelib.is-enabled", havingValue = "true", matchIfMissing = true)
public class SampleAutoConfiguration {
    @Bean
    @ConditionalOnMissingBean
    public SomeThing someThing() {
        return new SomeThing();
    }
}
그리고 application.yml (application.properties) 파일에서 속성을 통해 설정을 바꿀 수 있도록 간단한 Property 클래스도 생성해봤다.
import org.springframework.boot.context.properties.ConfigurationProperties;

@Getter
@Setter
@ConfigurationProperties(prefix = "samplelib")
public class SampleLibProperties {
    private boolean isEnabled;
}
이제 자동 설정이 되도록 만들어주어야 하는데 여기서부터 Spring Boot 버전에 따라 조금 다른데 Spring Boot 2.7 후반부터 AutoConfiguration 설정하는 방법이 조금 달라졌다(https://github.com/spring-projects/spring-boot/wiki/Spring-Boot-2.7-Release-Notes#changes-to-auto-configuration).
Spring Boot 2.7 이후

resources 폴더에 META-INF 라는 폴더를 만든 후 spring 이라는 폴더을 만들고 org.springframework.boot.autoconfigure.AutoConfiguration.imports 라는 파일 이름을 만들어 준다.
위 파일의 내용에는 자동 설정될 클래스의 경로를 적어주는데 만약 클래스가 여러 개라면 개행을 통해 여러 개를 같이 추가해줄 수 있다.
kr.pe.karsei.SampleAutoConfiguration
아까 주석이 있는 자동 설정 클래스에서는 @AutoConfiguration Annotation 을 사용해준다.
import org.springframework.boot.autoconfigure.condition.ConditionalOnMissingBean;
import org.springframework.context.annotation.Bean;
import org.springframework.context.annotation.Configuration;
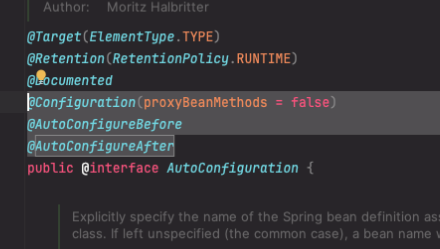
@AutoConfiguration
@EnableConfigurationProperties(SampleLibProperties.class)
@ConditionalOnProperty(name = "samplelib.is-enabled", havingValue = "true", matchIfMissing = true)
public class SampleAutoConfiguration {
@Bean
@ConditionalOnMissingBean
public SomeThing someThing() {
return new SomeThing();
}
}
Spring Boot 2.7 이전
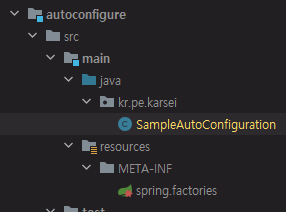
resources 폴더에 META-INF 라는 폴더를 만든 후 spring.factories 라는 파일을 만들어서 위에서 만든 자동 설정 클래스를 나중에 Spring Boot 에서 로드될 수 있도록 아래와 같이 작성했다.
org.springframework.boot.autoconfigure.EnableAutoConfiguration=\
kr.pe.karsei.SampleAutoConfiguration
설명
spring.factories - EnableAutoConfiguration
아래부터 설명하자면 spring.factories 파일에 아래와 같이 적은 것은 나중에 @EnableAutoConfiguration 으로 Configuration 을 불러올 수 있도록 한 것이다.
org.springframework.boot.autoconfigure.EnableAutoConfiguration우리가 보통 Spring 을 이용할 때는 어떤 AutoConfiguration 들을 사용해야 할지 신경쓰지 않지만, 자동으로 구성되기 위해서는 context 를 시작하기 전에 어떤 AutoConfiguration 들을 불러와야 할지 Spring 에서 알아야 하기 때문에 spring.factories 안에 값을 추가를 해주어야 한다.
@Configuration(proxyBeanMethods = false)
@Configuration(proxyBeanMethods = false) // 요거
@EnableConfigurationProperties(SampleLibProperties.class)
@ConditionalOnProperty(name = "samplelib.is-enabled", havingValue = "true", matchIfMissing = true)
public class SampleAutoConfiguration {
@Bean
@ConditionalOnMissingBean
public SomeThing someThing() {
return new SomeThing();
}
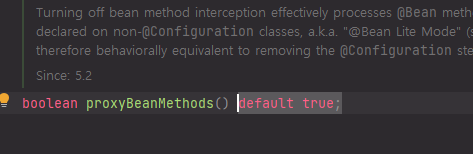
}@Configuration 에 proxyBeanMethods 가 false 로 된 것을 볼 수 있다.
현재 Spring 에서 @Configuration 의 proxyBeanMethods 는 기본적으로 true 로 되어 있는데, 이 말은 @Configuration 을 사용할 때 별 다른 설정을 주지 않고 사용하면 프록시 개체를 생성해서 사용한다는 것을 의미한다. 프록시는 실제 메서드를 한 번만 실행하도록 하기 때문에 싱글톤으로 인스턴스를 생성 후 나중에 Bean 에서 참조할 때 재사용할 수 있도록 해준다.
예를 들어보자
아래와 같이 구성되어 있을 때 SampleC 에 대해서 인스턴스가 어떻게 생성될까? 이 코드에서 SampleC 는 전부 같은 인스턴스로 사용하게 된다.
@Configuration(proxyBeanMethods = true)
public class SampleConfiguration {
    @Bean
    public SampleA sampleA() {
        SampleC c = sampleC();
        System.out.println("sampleA - "+ c);
        return new SampleA();
    }

    @Bean
    public SampleB sampleB() {
        SampleC c = sampleC();
        System.out.println("sampleB - "+ c);
        return new SampleB();
    }

    @Bean
    public SampleC sampleC() {
        SampleC c = new SampleC();
        System.out.println("sampleC - "+ c);
        return c;
    }

    @PostConstruct
    public void after() {
        System.out.println("config - " + this);
    }
}
config - kr.pe.karsei.SampleConfiguration$$EnhancerBySpringCGLIB$$8c68fcbd@72503b19
sampleC - kr.pe.karsei.SampleC@4f2d995e
sampleA - kr.pe.karsei.SampleC@4f2d995e
sampleB - kr.pe.karsei.SampleC@4f2d995e
위에서 SampleAutoConfiguration 은 프록시로 생성된 것을 확인할 수 있다.
보통 Spring Boot 에서 지원하는 AutoConfiguration 들은 Spring 의 구동 시간 단축과 불필요한 메모리 감소, 성능상 이점을 위해 proxyBeanMethods 을 false 로 사용한다.
@AutoConfiguration
Spring Boot 2.7 이후로 지원하는 것으로 자동 설정이 될 클래스를 지정해주는 annotation 이다.
before, after 를 사용하여 자동 설정 전/후에 진행되도록 설정해줄 수 있다.
해당 annotation 을 사용할 경우 기본적으로 @Configuration 이 적용되는데 여기서 proxyBeanMethods 는 false 로 되어 있다.
@EnableConfigurationProperties, @ConfigurationProperties
@Configuration(proxyBeanMethods = false)
@EnableConfigurationProperties(SampleLibProperties.class) // 요거
@ConditionalOnProperty(name = "samplelib.is-enabled", havingValue = "true", matchIfMissing = true)
public class SampleAutoConfiguration {
    @Bean
    @ConditionalOnMissingBean
    public SomeThing someThing() {
        return new SomeThing();
    }
}
import org.springframework.boot.context.properties.ConfigurationProperties;
@ConfigurationProperties(prefix = "samplelib") // 요거
public class SampleLibProperties {
private boolean isEnabled;
}예를 들면 .properties 와 같은 파일에서 어떤 기능의 활성화 여부라던지를 속성을 통해 값을 관리하고 싶을 경우가 있다. @ConfigurationProperties 는 이 역할을 할 수 있도록 돕는다.
@ConfigurationProperties 를 클래스에 붙이거나 @Configuration 안의 @Bean 으로 지정된 메서드에 이것을 붙여서 외부 설정으로 관리가 가능하도록 할 수 있다. 이 annotation 의 prefix 를 통해 어떤 이름의 속성 안으로 관리할 것인지 정할 수 있다.
예를 들면, 위에서 samplelib 이라고 prefix 를 정했고, 내부 변수로 isEnabled 가 있는데 isEnabled 의 경우 아래처럼 키가 정해진다.
samplelib.is-enabled따라서 만약 이것을 application.yml 이나 application.properties, bootstrap.yml 과 같은 속성 파일에서 값을 변경해주고 싶다면 아래처럼 사용하면 된다.
// yaml
samplelib:
  is-enabled: true

// properties
samplelib.is-enabled=true
이것과 관련된 바인딩 로직은 ConfigurationPropertiesBindingPostProcessor, ConfigurationPropertiesBinder, org.springframework.boot.context.properties.bind.Binder 이런 클래스에서 이루어지는데 알아만 두자
@EnableConfigurationProperties 는 위의 @ConfigurationProperties 를 찾아서 Bean 으로 만들어 주는 역할을 한다. 만약, @ConfigurationProperties 가 붙은 클래스를 Bean 으로 만든 것이 있다면 굳이 @EnableConfigurationProperties 이것을 사용할 필요는 없다.
@ConditionalOnProperty, @ConditionalOnMissingBean
@Configuration(proxyBeanMethods = false)
@EnableConfigurationProperties(SampleLibProperties.class)
@ConditionalOnProperty(name = "samplelib.is-enabled", havingValue = "true", matchIfMissing = true) // 요거
public class SampleAutoConfiguration {
    @Bean
    @ConditionalOnMissingBean // 요거
    public SomeThing someThing() {
        return new SomeThing();
    }
}
보통 @ConditionalOn 으로 붙는 annotation 들은 조건에 따라 무언가를 처리할 때 사용된다.
@ConditionalOnProperty 는 특정 Property 속성의 값에 따라 해당 클래스 또는 메서드의 사용이 결정된다.
그리고 @ConditionalOnMissingBean 을 사용한 것을 볼 수 있는데 이것은 같은 이름의 Spring Bean 이 정의되었다면 해당 Bean 을 사용하지 않고 기존의 Spring Bean 을 사용하라는 뜻이다.
기본적으로 Spring 에서 Bean Overriding 을 막고 있기 때문에 이 Annotation 을 사용하지 않으면 오류가 발생하므로 해당 Annotation 을 사용해야 한다.
이 외에도 @ConditionalOnBean, @ConditionalOnClass 등 조건에 따른 처리를 위한 annotation 들이 더 있다.
테스트
@ExtendWith(SpringExtension.class)
@EnableConfigurationProperties(SampleLibProperties.class)
@ContextConfiguration(classes = {SampleAutoConfiguration.class})
@TestPropertySource("classpath:application.properties")
class SampleAutoConfigurationTest {
    @Autowired
    private SampleLibProperties sampleLibProperties;

    @Test
    void test() {
        assertThat(sampleLibProperties.isEnabled()).isTrue();
    }
}
일반적이라면 @SpringBootTest 등으로 application.yml, application.properties 를 자동으로 가져오겠지만 위에서 진행한 예제는 자동으로 가져오지 않는다. @ContextConfiguration 의 initializer 를 ConfigDataApplicationContextInitializer 를 설정해주면 application.yml 파일을 가져오겠지만 일부러 AutoConfiguration 클래스를 지정하고, @TestPropertySource 로 설정 파일을 직접 지정해주었다.
References
'프로그래밍 > Spring' 카테고리의 다른 글
| [Spring] RestTemplate 과 MessageConverter 순서의 관계 (0) | 2023.02.05 |
|---|---|
| [Spring] ConversionService 활용해보기 (0) | 2022.11.21 |
| [JPA] QueryDSL 에서 오늘 날짜 활용해서 사용하기 (feat. Oracle) (0) | 2022.10.24 |
| [JPA] QueryDSL 에서 문자열을 숫자로 뽑아서 변환하기 (0) | 2022.10.24 |
| [JPA] Oracle 을 사용해서 Native Query 로 출력 개수까지 다 가져와보기 (0) | 2022.10.17 |